DevOps Tools/SCM/GitLab
| (25 intermediate revisions by one user not shown) | |||
| Line 1: | Line 1: | ||
| − | [[DevOps_Tools | + | [[DevOps_Tools/Overview|Overview]] | [[DevOps_Tools/CI|Continuous Integration (CI)]] | [[DevOps_Tools/SCM|Source Control Management (SCM)]] | [[DevOps_Tools/Containerization|Containerization]] | [[DevOps_Tools/Configuration|Configuration]] | [[DevOps_Tools/Integration|Integration]] |
| − | [[DevOps_Tools | + | =[[DevOps_Tools/SCM/GitLab|Git Lab]]= |
| − | =Installing= | + | ==Minimum Requirements== |
| + | The smallest instance documented is 20 Requests per second (RPS) or 1,000 users, where the recommended requirements are 8vCPU & 16GB of memory.<br> | ||
| + | For a tiny personal instance with a handful of users and hardly any RPS, it can be reduced further, however the startup time and operation can be impacted if below 4vCPU and 8GB of Memory. | ||
| + | ==Installing== | ||
Done on a CentOS7 machine. [https://about.gitlab.com/installation/#centos-7 Reference] | Done on a CentOS7 machine. [https://about.gitlab.com/installation/#centos-7 Reference] | ||
| − | ==Dependencies and Configuration== | + | ===Dependencies and Configuration=== |
| − | <nowiki>~$ sudo yum install -y curl policycoreutils-python openssh-server | + | <nowiki>~$ sudo yum install -y curl policycoreutils-python openssh-server cronie postfix |
| − | ~$sudo systemctl enable sshd | + | ~$ sudo systemctl enable sshd postfix |
| − | ~$sudo systemctl start sshd | + | ~$ sudo systemctl start sshd postfix |
| − | ~$sudo firewall-cmd --permanent --add-service=http | + | ~$ sudo firewall-cmd --permanent --add-service=http |
| − | ~$sudo systemctl reload firewalld | + | ~$ sudo systemctl reload firewalld</nowiki> |
| − | + | ||
| − | + | ||
| − | + | ||
| − | + | ||
| − | =Download Gitlab and Install= | + | ==Download Gitlab and Install== |
| − | <nowiki>~$ | + | <nowiki>~$ sudo curl https://packages.gitlab.com/install/repositories/gitlab/gitlab-ce/script.rpm.sh | sudo bash</nowiki> |
| − | + | Configure. After Gitlab 10.7, if you specified the External URL to be <code>https</code> then gitlab will automatically use Let's Encrypt to generate the SSL certificate.<br> | |
| − | + | '''NOTE:''' Make sure to change the ''<code>localhost</code>'' to your hostname and remove the ''<code>s</code>'' from ''<code>https</code>'' if you don't want SSL through let's encrypt. | |
| − | Configure. After Gitlab 10.7, if you specified the External URL to be <code>https</code> then gitlab will automatically use Let's Encrypt to generate the SSL certificate. | + | <nowiki>~$ sudo EXTERNAL_URL="https://localhost/gitlab" yum install -y gitlab-ce</nowiki> |
| − | <nowiki>~$ sudo EXTERNAL_URL="https://gitlab | + | When installation is complete you'll get a message confirming it: |
| + | <nowiki>Chef Client finished, 458/656 resources updated in 03 minutes 18 seconds | ||
| + | gitlab Reconfigured! | ||
| + | |||
| + | *. *. | ||
| + | *** *** | ||
| + | ***** ***** | ||
| + | .****** ******* | ||
| + | ******** ******** | ||
| + | ,,,,,,,,,***********,,,,,,,,, | ||
| + | ,,,,,,,,,,,*********,,,,,,,,,,, | ||
| + | .,,,,,,,,,,,*******,,,,,,,,,,,, | ||
| + | ,,,,,,,,,*****,,,,,,,,,. | ||
| + | ,,,,,,,****,,,,,, | ||
| + | .,,,***,,,, | ||
| + | ,*,. | ||
| + | |||
| + | |||
| + | |||
| + | _______ __ __ __ | ||
| + | / ____(_) /_/ / ____ _/ /_ | ||
| + | / / __/ / __/ / / __ `/ __ \ | ||
| + | / /_/ / / /_/ /___/ /_/ / /_/ / | ||
| + | \____/_/\__/_____/\__,_/_.___/ | ||
| + | |||
| + | |||
| + | Thank you for installing GitLab! | ||
| + | GitLab should be available at http://gitlab01.r00tedvw.com/gitlab</nowiki> | ||
| + | Browse to the webpage and set your admin password. log in using '''<code>root</code>''' as the username. | ||
| + | |||
| + | ==Add user== | ||
| + | At this time the only known (2) options to manage users are to: | ||
| + | *Use the GitLab API | ||
| + | *Use the GitLab Web Interface | ||
| + | |||
| + | |||
| + | ==ssh key== | ||
| + | ===Add user ssh key=== | ||
| + | First create the ssh key pair from the machine you'll be connecting to gitlab from. | ||
| + | <nowiki>~$ ssh-keygen | ||
| + | enerating public/private rsa key pair. | ||
| + | Enter file in which to save the key (/Users/demo/.ssh/id_rsa): | ||
| + | Enter passphrase (empty for no passphrase): | ||
| + | Enter same passphrase again: | ||
| + | Your identification has been saved in /Users/demo/.ssh/id_rsa. | ||
| + | Your public key has been saved in /Users/demo/.ssh/id_rsa.pub.</nowiki> | ||
| + | Next, print the public key | ||
| + | <nowiki>~$ cat ~/.ssh/id_rsa.pub | ||
| + | ssh-rsa AAAAB3NzaC1yc2EAAAADAQABAAABAQDMuyMtMl6aWwqBCvQx7YXvZd7bCFVDsyln3yh5/8Pu23LW88VXfJgsBvhZZ9W0rPBGYyzE/TDzwwITvVQcKrwQrvQlYxTVbqZQDlmsC41HnwDfGFXg+QouZemQ2YgMeHfBzy+w26/gg480nC2PPNd0OG79+e7gFVrTL79JA/MyePBugvYqOAbl30h7M1a7EHP3IV5DQUQg4YUq49v4d3AvM0aia4EUowJs0P/j83nsZt8yiE2JEYR03kDgT/qziPK7LnVFqpFDSPC3MR3b8B354E9Af4C/JHgvglv2tsxOyvKupyZonbyr68CqSorO2rAwY/jWFEiArIaVuDiR9YM5 demo@localhost</nowiki> | ||
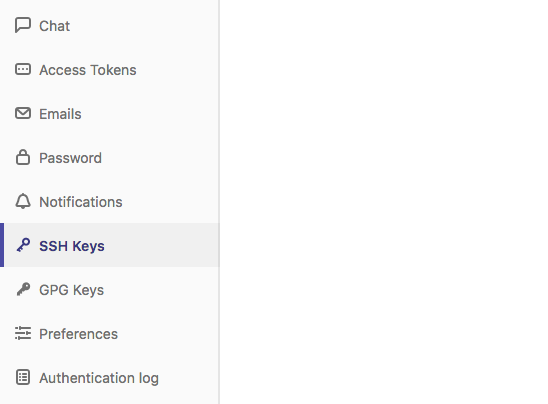
| + | Using the gitlab web interface, log in and select the SSH Keys menu item. Follow the instructions and save your SSH Key. | ||
| + | https://assets.digitalocean.com/articles/gitlab_install_1604/ssh_keys_menu_item2.png | ||
| + | |||
| + | ==new project== | ||
| + | You will need a new project in order to create repos within. From the web interface, create a new project and then from your git IDE (I use iterm2 with zsh) clone it. | ||
| + | <nowiki>~$ git clone git@localhost:user/test-project.git</nowiki> | ||
| + | Now you can being pushing files to gitlab. | ||
| + | ===Non-standard port=== | ||
| + | If you are using gitlab on non-standard ports, then you may need to add a config file so that git works. | ||
| + | <nowiki>~$ touch ~/.ssh/config | ||
| + | ~$ vim ~/.ssh/config | ||
| + | ... | ||
| + | Host localhost | ||
| + | HostName localhost | ||
| + | Port 8922 | ||
| + | User demo</nowiki> | ||
| + | |||
| + | ==Troubleshooting== | ||
| + | ===Unable to clone via SSH=== | ||
| + | Even with the ssh key in place, I was unable to clone any repo after a fresh install of gitlab. Looking at <code>/var/log/messages</code>, I saw the following: | ||
| + | <nowiki>Aug 9 04:10:36 ncwv-gitlab01 setroubleshoot: SELinux is preventing sshd from read access on the file authorized_keys. For complete SELinux messages run: sealert -l bdda8979-07aa-47bd-baac-e818c54abb49</nowiki> | ||
| + | This told me that SELinux was blocking sshd from reading a file. I put disabled SELinux and was able to clone the repo.<br> | ||
| + | Below is the SELinux module that I implemented which allowed me to clone without getting a password prompt (error in logs). | ||
| + | <nowiki>~$ cat local-gitlab.te | ||
| + | |||
| + | module local-gitlab 1.0; | ||
| + | |||
| + | require { | ||
| + | type var_t; | ||
| + | type sshd_t; | ||
| + | class file getattr; | ||
| + | class file read; | ||
| + | class file open; | ||
| + | } | ||
| + | |||
| + | #============= sshd_t ============== | ||
| + | |||
| + | #!!!! WARNING: 'var_t' is a base type. | ||
| + | allow sshd_t var_t:file getattr; | ||
| + | allow sshd_t var_t:file read; | ||
| + | allow sshd_t var_t:file open;</nowiki> | ||
Latest revision as of 21:46, 29 May 2024
Overview | Continuous Integration (CI) | Source Control Management (SCM) | Containerization | Configuration | Integration
Contents |
[edit] Git Lab
[edit] Minimum Requirements
The smallest instance documented is 20 Requests per second (RPS) or 1,000 users, where the recommended requirements are 8vCPU & 16GB of memory.
For a tiny personal instance with a handful of users and hardly any RPS, it can be reduced further, however the startup time and operation can be impacted if below 4vCPU and 8GB of Memory.
[edit] Installing
Done on a CentOS7 machine. Reference
[edit] Dependencies and Configuration
~$ sudo yum install -y curl policycoreutils-python openssh-server cronie postfix
~$ sudo systemctl enable sshd postfix
~$ sudo systemctl start sshd postfix

~$ sudo firewall-cmd --permanent --add-service=http
~$ sudo systemctl reload firewalld
[edit] Download Gitlab and Install
~$ sudo curl https://packages.gitlab.com/install/repositories/gitlab/gitlab-ce/script.rpm.sh | sudo bash
Configure. After Gitlab 10.7, if you specified the External URL to be https then gitlab will automatically use Let's Encrypt to generate the SSL certificate.
NOTE: Make sure to change the localhost to your hostname and remove the s from https if you don't want SSL through let's encrypt.
~$ sudo EXTERNAL_URL="https://localhost/gitlab" yum install -y gitlab-ce
When installation is complete you'll get a message confirming it:
Chef Client finished, 458/656 resources updated in 03 minutes 18 seconds
gitlab Reconfigured!

       *.                  *.
      ***                 ***
     *****               *****
    .******             *******
    ********            ********
   ,,,,,,,,,***********,,,,,,,,,
  ,,,,,,,,,,,*********,,,,,,,,,,,
  .,,,,,,,,,,,*******,,,,,,,,,,,,
      ,,,,,,,,,*****,,,,,,,,,.
         ,,,,,,,****,,,,,,
            .,,,***,,,,
                ,*,.


     _______ __  __          __
    / ____(_) /_/ /   ____ _/ /_
   / / __/ / __/ /   / __ `/ __ \
  / /_/ / / /_/ /___/ /_/ / /_/ /
  \____/_/\__/_____/\__,_/_.___/


Thank you for installing GitLab!
GitLab should be available at http://gitlab01.r00tedvw.com/gitlab
Browse to the webpage and set your admin password. log in using root as the username.
[edit] Add user
At this time the only known (2) options to manage users are to:
- Use the GitLab API
- Use the GitLab Web Interface
[edit] ssh key
[edit] Add user ssh key
First create the ssh key pair from the machine you'll be connecting to gitlab from.
~$ ssh-keygen
enerating public/private rsa key pair.
Enter file in which to save the key (/Users/demo/.ssh/id_rsa):
Enter passphrase (empty for no passphrase):
Enter same passphrase again:
Your identification has been saved in /Users/demo/.ssh/id_rsa.
Your public key has been saved in /Users/demo/.ssh/id_rsa.pub.
Next, print the public key
~$ cat ~/.ssh/id_rsa.pub
ssh-rsa AAAAB3NzaC1yc2EAAAADAQABAAABAQDMuyMtMl6aWwqBCvQx7YXvZd7bCFVDsyln3yh5/8Pu23LW88VXfJgsBvhZZ9W0rPBGYyzE/TDzwwITvVQcKrwQrvQlYxTVbqZQDlmsC41HnwDfGFXg+QouZemQ2YgMeHfBzy+w26/gg480nC2PPNd0OG79+e7gFVrTL79JA/MyePBugvYqOAbl30h7M1a7EHP3IV5DQUQg4YUq49v4d3AvM0aia4EUowJs0P/j83nsZt8yiE2JEYR03kDgT/qziPK7LnVFqpFDSPC3MR3b8B354E9Af4C/JHgvglv2tsxOyvKupyZonbyr68CqSorO2rAwY/jWFEiArIaVuDiR9YM5 demo@localhost
Using the gitlab web interface, log in and select the SSH Keys menu item. Follow the instructions and save your SSH Key.
[edit] new project
You will need a new project in order to create repos within. From the web interface, create a new project and then from your git IDE (I use iterm2 with zsh) clone it.
~$ git clone git@localhost:user/test-project.git
Now you can being pushing files to gitlab.
[edit] Non-standard port
If you are using gitlab on non-standard ports, then you may need to add a config file so that git works.
~$ touch ~/.ssh/config
~$ vim ~/.ssh/config
...
Host localhost
HostName localhost
Port 8922
User demo
[edit] Troubleshooting
[edit] Unable to clone via SSH
Even with the ssh key in place, I was unable to clone any repo after a fresh install of gitlab. Looking at /var/log/messages, I saw the following:
Aug 9 04:10:36 ncwv-gitlab01 setroubleshoot: SELinux is preventing sshd from read access on the file authorized_keys. For complete SELinux messages run: sealert -l bdda8979-07aa-47bd-baac-e818c54abb49
This told me that SELinux was blocking sshd from reading a file. I put disabled SELinux and was able to clone the repo.
Below is the SELinux module that I implemented which allowed me to clone without getting a password prompt (error in logs).
~$ cat local-gitlab.te

module local-gitlab 1.0;

require {
	type var_t;
	type sshd_t;
	class file getattr;
	class file read;
	class file open;
}

#============= sshd_t ==============

#!!!! WARNING: 'var_t' is a base type.
allow sshd_t var_t:file getattr;
allow sshd_t var_t:file read;
allow sshd_t var_t:file open;